
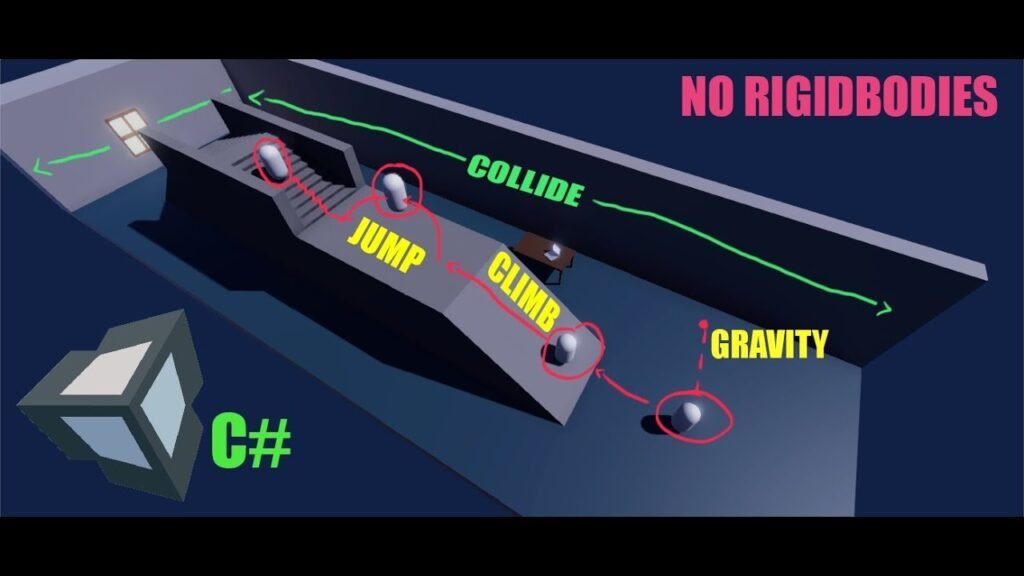
When diving into game development with Unity, one of the first hurdles you’ll encounter is character movement. Whether you’re creating a simple 2D platformer or an immersive 3D open-world game, getting your character to move naturally and responsively is crucial. That’s where the Unity Character Controller comes into play.
The Unity Character Controller is a powerful component that simplifies the process of controlling characters in your game. It provides a straightforward way to handle movement, jumping, and collision detection without needing to write complex physics code from scratch. Whether you’re a beginner or a seasoned developer, understanding how to use and customize the Character Controller can save you a lot of time and effort.
In this guide, we’ll break down everything you need to know about the Unity Character Controller. From the basics of setting it up to advanced techniques for fine-tuning movement, you’ll get a comprehensive look at how to make your characters move smoothly and realistically.
Setting Up the Unity Character Controller
Creating a New Project in Unity
Before we dive into the Character Controller itself, let’s start by setting up a new project in Unity. Open Unity Hub, click on “New Project,” and choose the 3D template. Give your project a name like “CharacterControllerDemo” and hit “Create.”
Once your project is set up, you’ll be greeted with the default Unity layout. This includes the Scene view, Game view, Hierarchy, Inspector, and Project panels. Familiarizing yourself with these panels will make it easier to follow along as we build our character controller.
Adding a Character Model
To use the Character Controller, you’ll need a character model. Unity provides some basic models in the Asset Store, or you can create your own. For this tutorial, we’ll use a simple capsule to represent our character.
In the Hierarchy panel, right-click and select “3D Object > Capsule.” This capsule will act as our placeholder character. Rename it to “Player” for clarity. Position the capsule above the ground plane so it doesn’t immediately fall through the scene when we hit play.
Adding the Character Controller Component
With our capsule selected, navigate to the Inspector panel and click “Add Component.” Search for “Character Controller” and add it to the capsule. You’ll notice a new component appears with several settings like “Slope Limit,” “Step Offset,” and “Skin Width.” We’ll go over these settings in detail later, but for now, you’ve successfully added the Character Controller to your project.
Understanding Character Controller Settings
Slope Limit
The “Slope Limit” setting determines the steepest angle your character can walk up. By default, it’s set to 45 degrees, meaning your character can walk up slopes that are less than or equal to 45 degrees but will slide down anything steeper. Adjusting this value allows you to control how your character interacts with different terrains.
If you’re creating a game where characters need to climb steep mountains, you might want to increase this value. Conversely, for a game with more realistic physics, keeping the default or lowering it could provide a more natural feel.
Step Offset
“Step Offset” controls how high your character can step over obstacles. Imagine your character encountering a small ledge or a step—this setting determines whether they can step over it smoothly or need to jump. The default is usually set to 0.3, which works well for most cases, but you can adjust it depending on your game’s needs.
For example, in a platformer game where precise jumping is crucial, you might want to lower this value to ensure the player can’t accidentally step over obstacles meant to be jumped over.
Skin Width
The “Skin Width” setting helps prevent your character from getting stuck in walls or other colliders. It creates a small buffer around the character, allowing for smoother movement and collision detection. A typical value is around 0.08, but this can be tweaked depending on your character’s size and the complexity of your environment.
Increasing the skin width can make movement feel more fluid, especially in tight spaces, while decreasing it might provide more precise control at the risk of getting stuck in certain scenarios.
Basic Character Movement Scripting
Creating a Movement Script
Now that we’ve set up the Character Controller, it’s time to get our character moving. We’ll create a simple C# script to handle basic movement.
In the Project panel, right-click and select “Create > C# Script.” Name the script “PlayerMovement” and double-click it to open in your preferred code editor.
Writing the Movement Code
Here’s a basic script to get your character moving:
This script does a few key things:
- Speed Control: The
speedvariable determines how fast the character moves. - Input Handling:
Input.GetAxis("Horizontal")andInput.GetAxis("Vertical")capture player input from the keyboard (arrow keys or WASD). - Movement Calculation: The movement vector combines horizontal and vertical inputs to move the character in the desired direction.
- Character Movement:
controller.Move()applies the movement to the Character Controller.
Attaching the Script
Save your script and return to Unity. Drag the “PlayerMovement” script onto your capsule (the “Player” object) in the Hierarchy. Hit “Play,” and you should see your capsule moving in response to keyboard input!
Adding Gravity and Jumping
Implementing Gravity
Right now, our character moves on a flat plane but doesn’t respond to gravity. Let’s fix that by modifying our script to include gravity.
Update your PlayerMovement script as follows:
Now your character will fall due to gravity. However, we still need to add jumping functionality.
Adding Jumping Mechanics
To enable jumping, we’ll introduce a jump height variable and modify the script to detect when the player is on the ground.
Here’s the updated script:
With this script, your character can now jump when grounded. The Mathf.Sqrt function calculates the jump force needed to reach the specified height, and gravity ensures the character falls back down naturally.
Fine-Tuning Character Movement
Adjusting Movement Speed
Sometimes, the default movement speed might not feel right for your game. You can adjust the speed variable in the Inspector to make your character move faster or slower. Experiment with different values to see what feels best for your game.
You can also introduce a sprint mechanic by modifying the script to detect when the “Shift” key is held down:
This simple addition lets your character sprint when holding “Shift,” adding more depth to the movement mechanics.
Enhancing Jumping Mechanics
If you want to give your jumps a more dynamic feel, consider adding variable jump heights based on how long the player holds the jump button. This can make the game feel more responsive and give players more control over their movements.
Modify the jumping section of your script like this:
Now, releasing the jump button early will result in a shorter jump, while holding it down will allow the character to reach the full jump height.
Adding Air Control
In some games, it’s important for the player to have control over their character even while airborne. To achieve this, we can adjust the movement code to allow limited control while jumping or falling.
Here’s how you can modify the movement section:
This adjustment allows the player to control the character mid-air, but at a reduced speed, creating a more balanced and realistic feel.
Conclusion
The Unity Character Controller is an essential tool for game developers looking to create smooth and responsive character movement. By understanding its settings, scripting basic movement, and fine-tuning your controls, you can craft engaging gameplay experiences that feel natural and intuitive.
Whether you’re building a fast-paced platformer, an open-world adventure, or a narrative-driven RPG, mastering the Character Controller will give you the foundation you need to bring your characters to life. Keep experimenting with different settings and techniques to find what works best for your unique game.