Drawing is a timeless art form that allows us to connect with nature, express creativity, and refine our artistic skills. One fascinating subject to draw is wheat, an iconic symbol of harvest, abundance, and resilience. With its intricate structure and graceful lines, wheat offers an excellent opportunity for artists of all levels to challenge their creativity and attention to detail. This article will take you through a detailed guide on wheat drawing, from understanding its anatomy to mastering advanced techniques for a realistic or stylized portrayal.
The Anatomy of Wheat: Understanding Your Subject
Before you pick up your pencil, it’s crucial to study the structure of wheat. A solid understanding of its anatomy will help you capture its essence accurately in your drawing.
Breaking Down the Wheat Plant
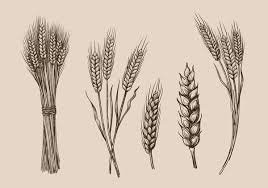
Wheat consists of several parts that contribute to its unique appearance:
- The stalk: The long, slender stem supports the wheat head and gives it its height and elegance.
- The nodes and internodes: Nodes are the slightly thicker areas along the stalk where leaves emerge, while internodes are the sections between nodes.
- The leaves: Thin and blade-like, these leaves extend from the nodes and often curve gracefully.
- The wheat head (spike): The crown jewel of the wheat plant, the head contains multiple small florets, each housing kernels of grain.
Observing the Details
Take a close look at a real wheat stalk or high-quality reference photos. Notice how the stalk tapers as it ascends, how the leaves curve, and how the wheat head’s texture varies. Paying attention to these details will guide your drawing and make it more lifelike.
Capturing the Texture
The texture of wheat is an essential element to consider. The stalk has a smooth but subtly ribbed surface, while the wheat head is characterized by its layered arrangement of kernels and bristles. Understanding these textures will allow you to create depth and realism in your drawing.
Tools and Materials: What You’ll Need
Having the right tools can make a significant difference in your wheat drawing journey. While you don’t need an extensive collection, a few essential items can elevate your artwork.
Basic Supplies
- Pencils: A range of graphite pencils (HB, 2B, 4B, and 6B) will allow you to create both fine details and deep shadows.
- Erasers: A kneaded eraser for soft adjustments and a precision eraser for intricate highlights.
- Paper: Choose a medium-textured drawing paper that can handle multiple layers of shading.
- Sharpener: A sharp pencil is essential for capturing the fine details of wheat.
Optional Tools for Advanced Drawings
- Colored pencils or pastels: Add a touch of color to bring your wheat drawing to life.
- Blending tools: Use blending stumps or tissue paper for smooth shading transitions.
- Fine-tipped pens: For adding outlines or intricate details.
Setting Up Your Workspace
A well-lit and comfortable workspace can enhance your focus and precision. Place your reference image or real wheat stalk in a position where you can easily observe it. Ensure your tools are organized and within reach.
Step-by-Step Guide to Drawing Wheat
Now that you’re prepared, let’s dive into the step-by-step process of drawing wheat. Each stage focuses on building your artwork from basic shapes to intricate details.
Step 1: Sketching the Basic Shapes
Begin by lightly sketching the overall structure of the wheat stalk. Use simple shapes to outline the stalk, leaves, and wheat head.
- Draw a straight or slightly curved vertical line to represent the stalk.
- Add elongated ovals or teardrop shapes at the top for the wheat head.
- Sketch narrow, curved lines emerging from the stalk to indicate the leaves.
Step 2: Adding the Wheat Head Details
The wheat head is the focal point of your drawing. Break it down into small sections:
- Draw overlapping ovals or diamond shapes to represent individual kernels.
- Add fine lines extending from each kernel to mimic the bristles.
- Vary the size and spacing of kernels to create a natural look.
Step 3: Refining the Stalk and Leaves
Work on the stalk by adding subtle lines to suggest its ribbed texture. For the leaves:
- Outline their edges with a slightly jagged line to reflect their natural imperfections.
- Use light shading to depict their curvature and shadows.
Step 4: Shading for Depth and Dimension
Shading is where your drawing truly comes to life:
- Use an HB pencil for light areas and darker pencils (4B or 6B) for shadows.
- Apply smooth, even strokes to shade the stalk and leaves.
- Add tiny cross-hatching or stippling on the wheat head for texture.
Step 5: Adding Final Touches
Review your drawing and make adjustments as needed:
- Erase any stray marks or smudges.
- Enhance highlights by gently lifting graphite with a kneaded eraser.
- Use a fine-tipped pen or sharp pencil to emphasize key details, such as bristles or edges.
Exploring Styles: Realism vs. Abstraction
Wheat drawing doesn’t have to stick to realism. Experimenting with different styles can add a unique flair to your artwork.
Realistic Wheat Drawing
For a realistic approach:
- Focus on accurate proportions and intricate details.
- Use shading techniques like blending and layering to create depth.
- Pay attention to light sources to make your drawing three-dimensional.
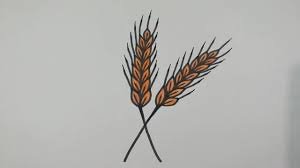
Abstract or Stylized Wheat Drawing
If you prefer a more artistic or whimsical style:
- Simplify the shapes and use bold outlines.
- Experiment with unconventional colors and textures.
- Incorporate patterns or geometric elements for a modern twist.
Mixed Media Techniques
Combine different materials for a dynamic effect. For example, use watercolor washes for the background and fine ink pens for the wheat details. This approach can create a striking contrast.
Common Mistakes and How to Avoid Them
Even seasoned artists encounter challenges. Here are some common pitfalls in wheat drawing and tips to overcome them.
Mistake 1: Overlooking Proportions
Proportions are vital for a balanced composition. Use light guidelines to maintain the correct ratios between the stalk, leaves, and wheat head.
Mistake 2: Neglecting Texture
Without texture, your drawing may appear flat. Spend time adding fine details, such as ribbing on the stalk and bristles on the kernels, to create a realistic effect.
Mistake 3: Overworking the Drawing
Too many layers or heavy shading can make your drawing look muddy. Work gradually, stepping back frequently to assess your progress.
The Symbolism of Wheat in Art
Wheat has long been a symbol in art, representing abundance, prosperity, and nature’s cycles. Incorporating wheat into your drawings can add a layer of meaning and connect your work to a rich artistic tradition.
Historical Significance
Wheat appears in ancient murals, tapestries, and religious art, often symbolizing fertility and renewal. Understanding its symbolism can inspire your artistic choices.
Modern Interpretations
Contemporary artists use wheat as a motif in abstract works, eco-art, and digital illustrations. Experiment with these styles to bring a modern touch to your wheat drawing.
Conclusion: Harvesting Your Creativity
Drawing wheat is a rewarding artistic endeavor that combines technical skill with creative expression. By understanding its anatomy, mastering shading techniques, and exploring various styles, you can create stunning wheat drawings that capture the elegance of nature. Whether you’re a beginner or an experienced artist, this guide provides the tools and inspiration to elevate your artwork. So grab your pencils, embrace the process, and let your creativity flourish like a golden field of wheat.